Showing posts with label after. Show all posts

Monday, April 2, 2012

The Gingerbread Transformation

So our gingerbread has been restored!  This has actually been done for a while now...but winter and life got in the way of me posting the 'after' photo.  A huge thank you to Mark Lucking Renovations for doing an amazing job with this incredibly detailed work (and at a way better price than any other quote we received :). 

Pretty great, eh?  In the end, the gingerbread (or vergeboard as I'm told it's actually called) was too rotted to be salvaged without major reinforcing so we opted to laminate new plywood on top of the original vergeboard.  Mark then painstakingly cut out the pattern, using the original wood as a template.  We couldn't be happier with the results!!

Through the painstaking process of removing 120 years worth of latex, oil, and lead paint from the wood Mark also discovered the original colours of the woodwork!  In true Victorian fashion, it was bright red and bright green!  Man oh man, those 19th century Canadians were brave in their colour choices...not like today's beige on beige on beige on taupe...

Saturday, August 13, 2011

Finishing off the Ground Floor Tour

With just a couple more weeks before we move into and start renovating the upstairs apartment of our house, I thought it was about time I finished off the ground floor tour.  Just like the kitchen, I wouldn't call any of these spaces 'done', but they have come a long way from when we first bought the house 2 years ago.

So...in case you missed them, you can see the kitchen here and the Living and Dining rooms here.  Now onto the bedroom, bathroom, and vestibule.

Here is how the bedroom looked when we purchased the house (all furniture belongs to the previous owner).
The previous owner actually apologized to us for this colour before handing over the keys.  Oh well, that was an easy fix.  We had ambitions to replace that acoustic tile ceiling with drywall...but that never happened...hopefully someday!  Anyways, here's how the bedroom looks now, or rather how it looked before we rented the downstairs apartment out last month...
If you're wondering why this room lacks the high ceilings and beautiful detailing of the rest of the house, it's because it was an addition added on at some point (though it's still very old).  Still, it's amazing what a little paint can do.  Oh, and that dresser was a great find at an estate sale.  It's a 1960's made in Canada piece that Tessa sanded down, stained Walnut, and switched out the original hardware with something a little more modern.

The biggest project in this room was adding built-in closet space.  For a solution, we looked no further than...Ikea:
Using hardware from Ikea's Kvartal line, we made six sliding fabric panels - much less expensive and less permanent than building in a wall with doors.  Ikea sells pre-made panels for this system...but we weren't too crazy about any of them, so we sewed these up using a few yards of fabric...still bought from Ikea.

Beyond paint, we didn't do too much to the bathroom.  The previous owners had installed the shower not long before we purchased the house and thankfully their taste in shower doors was much better than their taste in paint...here's the before (left) and after (right):
And here are a few more views.  You just can't beat the character found in these old houses - like that beautiful stained glass window over the bathtub.
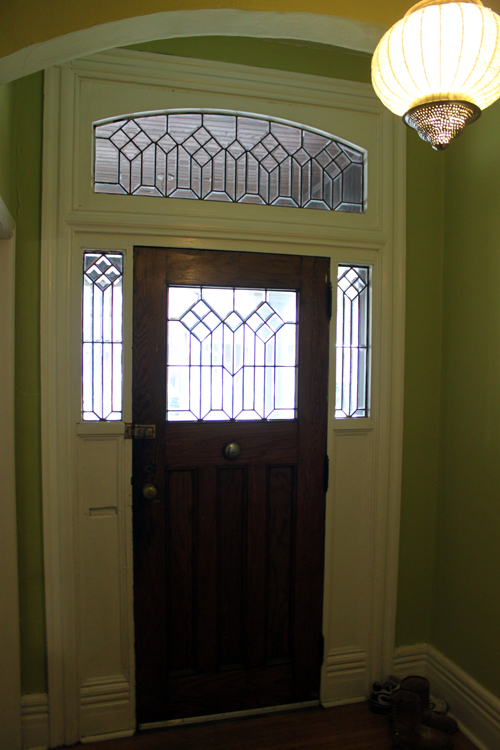
Having a bathroom this large on the ground floor of a Victorian house is rare and was definitely one of the features that sold us on the place.  This space would have originally been a hallway leading from the front door to the kitchen...I think this bathroom is a much better use of space.  Speaking of the front door, that brings us to the last space on the ground floor...the front vestibule.  This is the best before shot I have:
In this space, all we have done so far is paint and hang a new light fixture.
I wish I could say that we bought that light fixture while travelling in Morocco and that we met the artisan who made it and he was a really cool guy...but that would be lying.  We've never been to Morocco...we bought it at Home Sense...and it was on sale...only $50 I think!

So, there you have it - the rest of the ground floor.  We've been itching to tackle some projects upstairs in the fall and have been making lots of plans...stay tuned!

Oh, and here are the colours we used in these rooms:
Bedroom:  Benjamin Moore, Boothbay Gray, HC-165
Bathroom: Benjamin Moore, Gray, 2121-10 (really!  they couldn't come up with a better name?)
Vestibule: ICI, Shakespeare

Saturday, June 11, 2011

Porch Restoration Part 2: DONE!

The porch is finally done!  It's taken a few weeks for the finishing touches, but we finally made it.  Of our Porch Paint Possibilities, option #4 was the winner (but with a few tweaks).  We ended up painting the floor of the porch black rather than light gray.  Keeping it gray just made for too many contrasting elements.

We also ended up with a bit more yellow compared to any of our concept schemes.  We struggled with this.  We kept going back and forth on the whole black and yellow thing (all the while having this song stuck in our head).  Would it make the house look like the home of the city's biggest Hamilton Tiger-Cat fans?  Or like some sort of Victorian haunted house.  Hmmmm, what to do.  In the end we went for it....but not without toning down our Stuart Gold by mixing in some of the Sandy Hook Gray

I can't tell you how happy I am with how it all turned out - especially the front door!  It's hard to believe we left this incredible wood door concealed behind an ugly brown screen door for so long:

Friday, April 15, 2011

La Pièce de Résistance

Last week on Citify I mentioned that we had installed what I consider to be 'La Pièce de Résistance' in our Living Room. Did you spot it? Well, it's the new light fixture. It may sound strange, but finding a light fixture for this room has been a pretty big challenge. You see, there were many requirements that said fixture had to fill:
  • it had to be light since there is no electrical box to attach it to (originally there would have been a gas fixture here, it was converted to an electrical fixture later by poking some wires through the centre of the plaster medallion)
  • it had to have a small ceiling plate so as to not cover too much of the plaster medallion
  • it had to have both an uplight and downlight component (without any uplighting it would cast a shadow on the plaster medallion)
  • it had to be just the right scale, not too big / dominating and not too small / wimpy
  • it had to complement the light fixture in the nearby Dining Room as they can both be seen together
We spent many a hour scouring stores and the internet to find a light fixture that was just right.  Here are a few of the finalists:


1. Alhambra MES Spherical Suspension Light  2. Cactus Pendant Light  3. Modulo S35 Pendant Lamp

4. Ossy Pendant  5. Propeller Lamp  6. Saucer Criss Cross Lamp

In the end, we chose a Link Suspension Light in American White Wood by LZF - a company that works out of a converted winery on the outskirts of the village of Chiva in the province of Valencia, Spain.


The fixture is made up of Mobius strips piled on top of one another.  This arrangement makes for an incredibly sculptural piece that takes on different forms from every angle it is viewed from.  While the form is decidedly modern, we like the fact that it is made from wood, a natural material.  It gives the light so much warmth and helps it to 'fit in' amongst the many eclectic pieces of our living room.

Installing it was no piece of cake.  In fact, it took my dad and I 3.5 hours and several test installations before we were happy with the final product.  In the absence of a electrical box, we drilled into the no longer active gas pipe for support.  However, this left the ceiling cover plate hanging too low with a gap in between the cover plate and medallion.  Our choice was either to cut the gas pipe off higher, requiring us to also 'chisel' away at the delicate plaster medallion or to improvise.  We chose to improvise:


Thankfully, my Dad saves everything and he had another cover plate that was identical in finish and similar in size to the one that came with the fixture.  We used this to mediate the gap.  Essentially, the final product has a double ceiling plate.


Be honest now, if I hadn't told you that, would you have noticed?

We're quite pleased with the final result.  Lighting is such an important part of space design.  Horrible lighting can make a great space incredibly unpleasant while great lighting can really elevate an already great space into something, well...greater!

-kyle

Sunday, April 10, 2011

Living and Dining Room...After

As promised, here are some after photos of our Living and Dining Rooms:

So most of the new pieces in this photo are from...you guessed it...Ikea.  Expedit shelves, Mongstad mirror, Gilbert Dining Room chairs (though the colour has since been discontinued), and the Olunda alphabet print (the perfect print for an Interior Designer turned Preschool Teacher...aka, Tessa). (see it before)

Our Dining Room chandelier, purchased from Living Lighting. (see it before)

Though everything around it has changed, the fireplace remains the same...more on that later.  The rug in this photo was from...cringe...this place, but it was a steal at $30!  The painting, lamp, and vase were all from Home Sense (we're clearly still being weaned off of big box stores...sigh) (see it before)

We rescued this couch from the peril of dumpsterdom at Ikea (as it was being discontinued), though we still had to pay for it, it was a great deal!  The painting is a Tessa original...based on one that Ikea used to sell. (see it before)

There's the newest addition to our family.
(see it before)

The bay window with a chaise, also saved from Ikea dumpsterdom.
(see it before)

There you have it.  The Living and Dining Rooms as they look today.  The colours are Benjamin Moore with Boothbay Gray (HC165) on the walls and Wrought Iron (2124-10) above the fireplace. 

As I said before, for now, the rooms are done.  There are a couple longer term things we plan to do, such as refinish the hardwood floors, do something with the fireplace...and Tessa is already thinking of repainting!

-kyle and tessa